Managing content in T4
Adding new content
When you log in to T4, you'll be presented with the Site Structure. This shows the structure of your website.
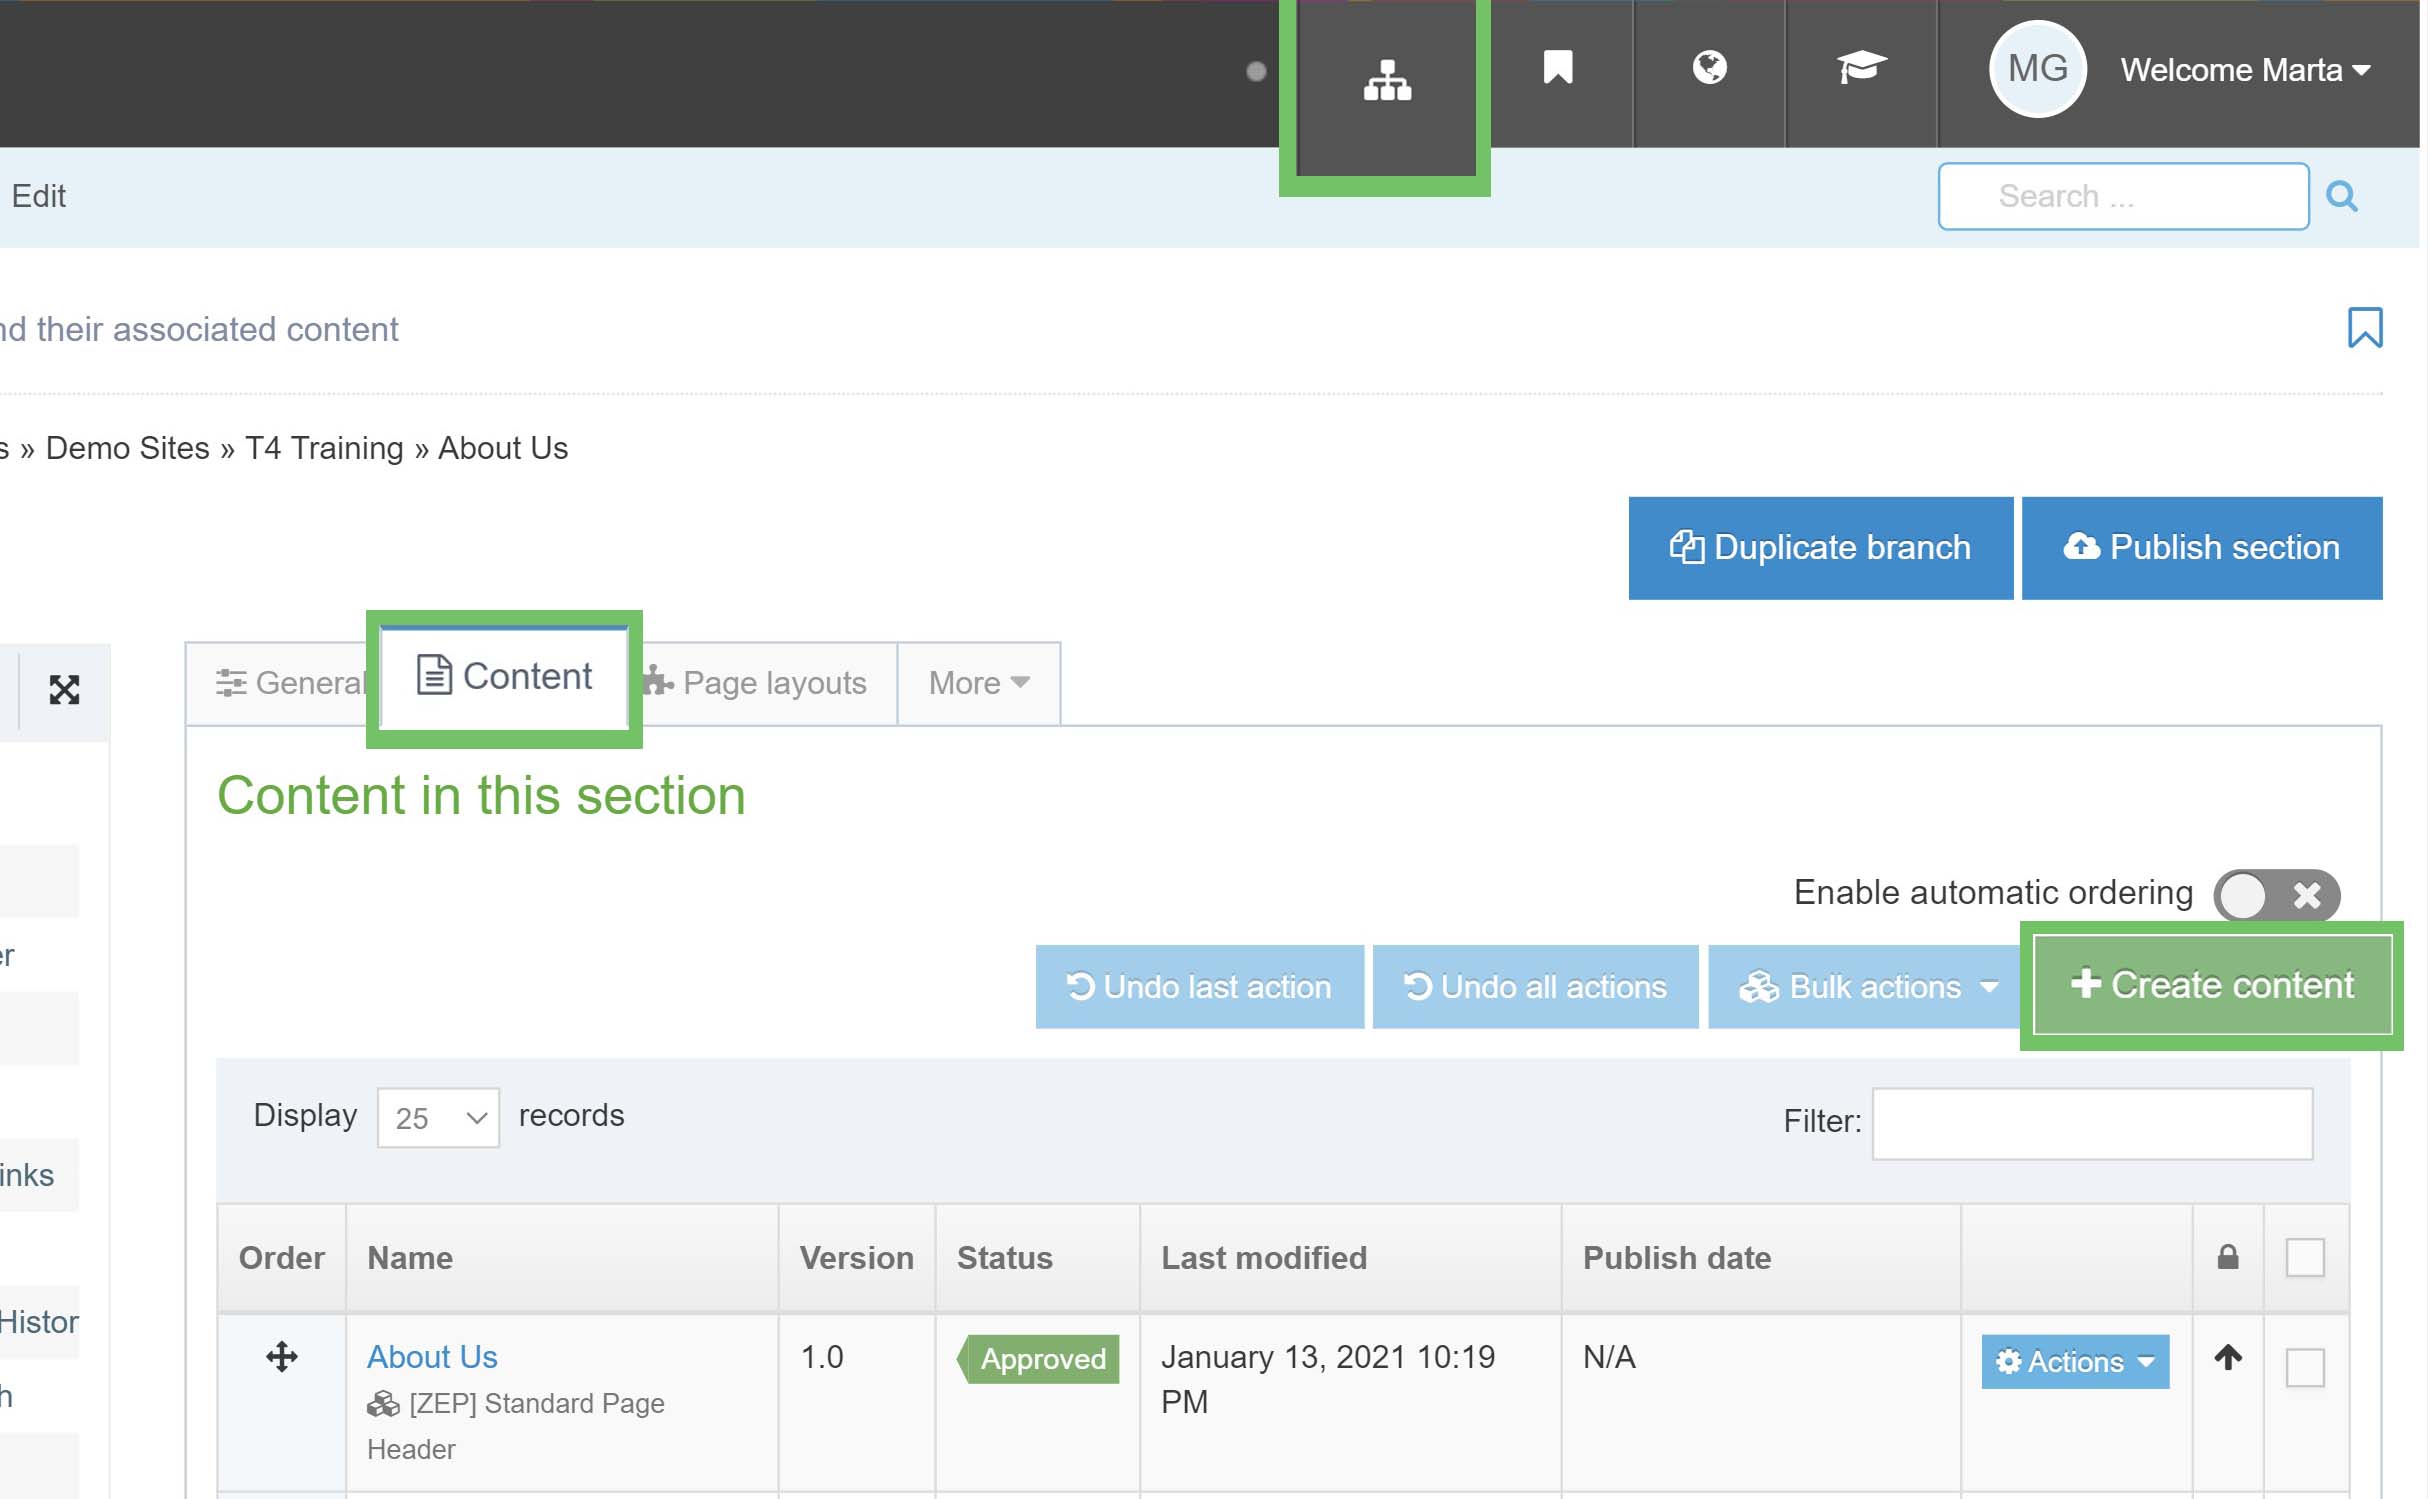
To add content, click into your page from the site structure. Then select the 'Content' tab and click the green 'Create content' button. You'll then see a full list of Content Types (components).
Choose a content type
We have a variety of content components available. These are called Content Types. Use the filter to search for the content type you'd like to use. You'll only see content types that are available to use on your page.
You can find further details of content types on our Live Components page.
Add content to a section
When you select a Content Type, you'll move to a new screen to populate the component.
The first field is always 'Name'. This is the name of the Content Type for reference in the back end of the website. It will not appear on the live page.
All fields marked with a red asterisk (*) are mandatory. You can hover your mouse over a field to display help text (eg purpose of field, number of words).
Edit existing content
Use the Site Structure to find the Section which contains the content you want to edit.
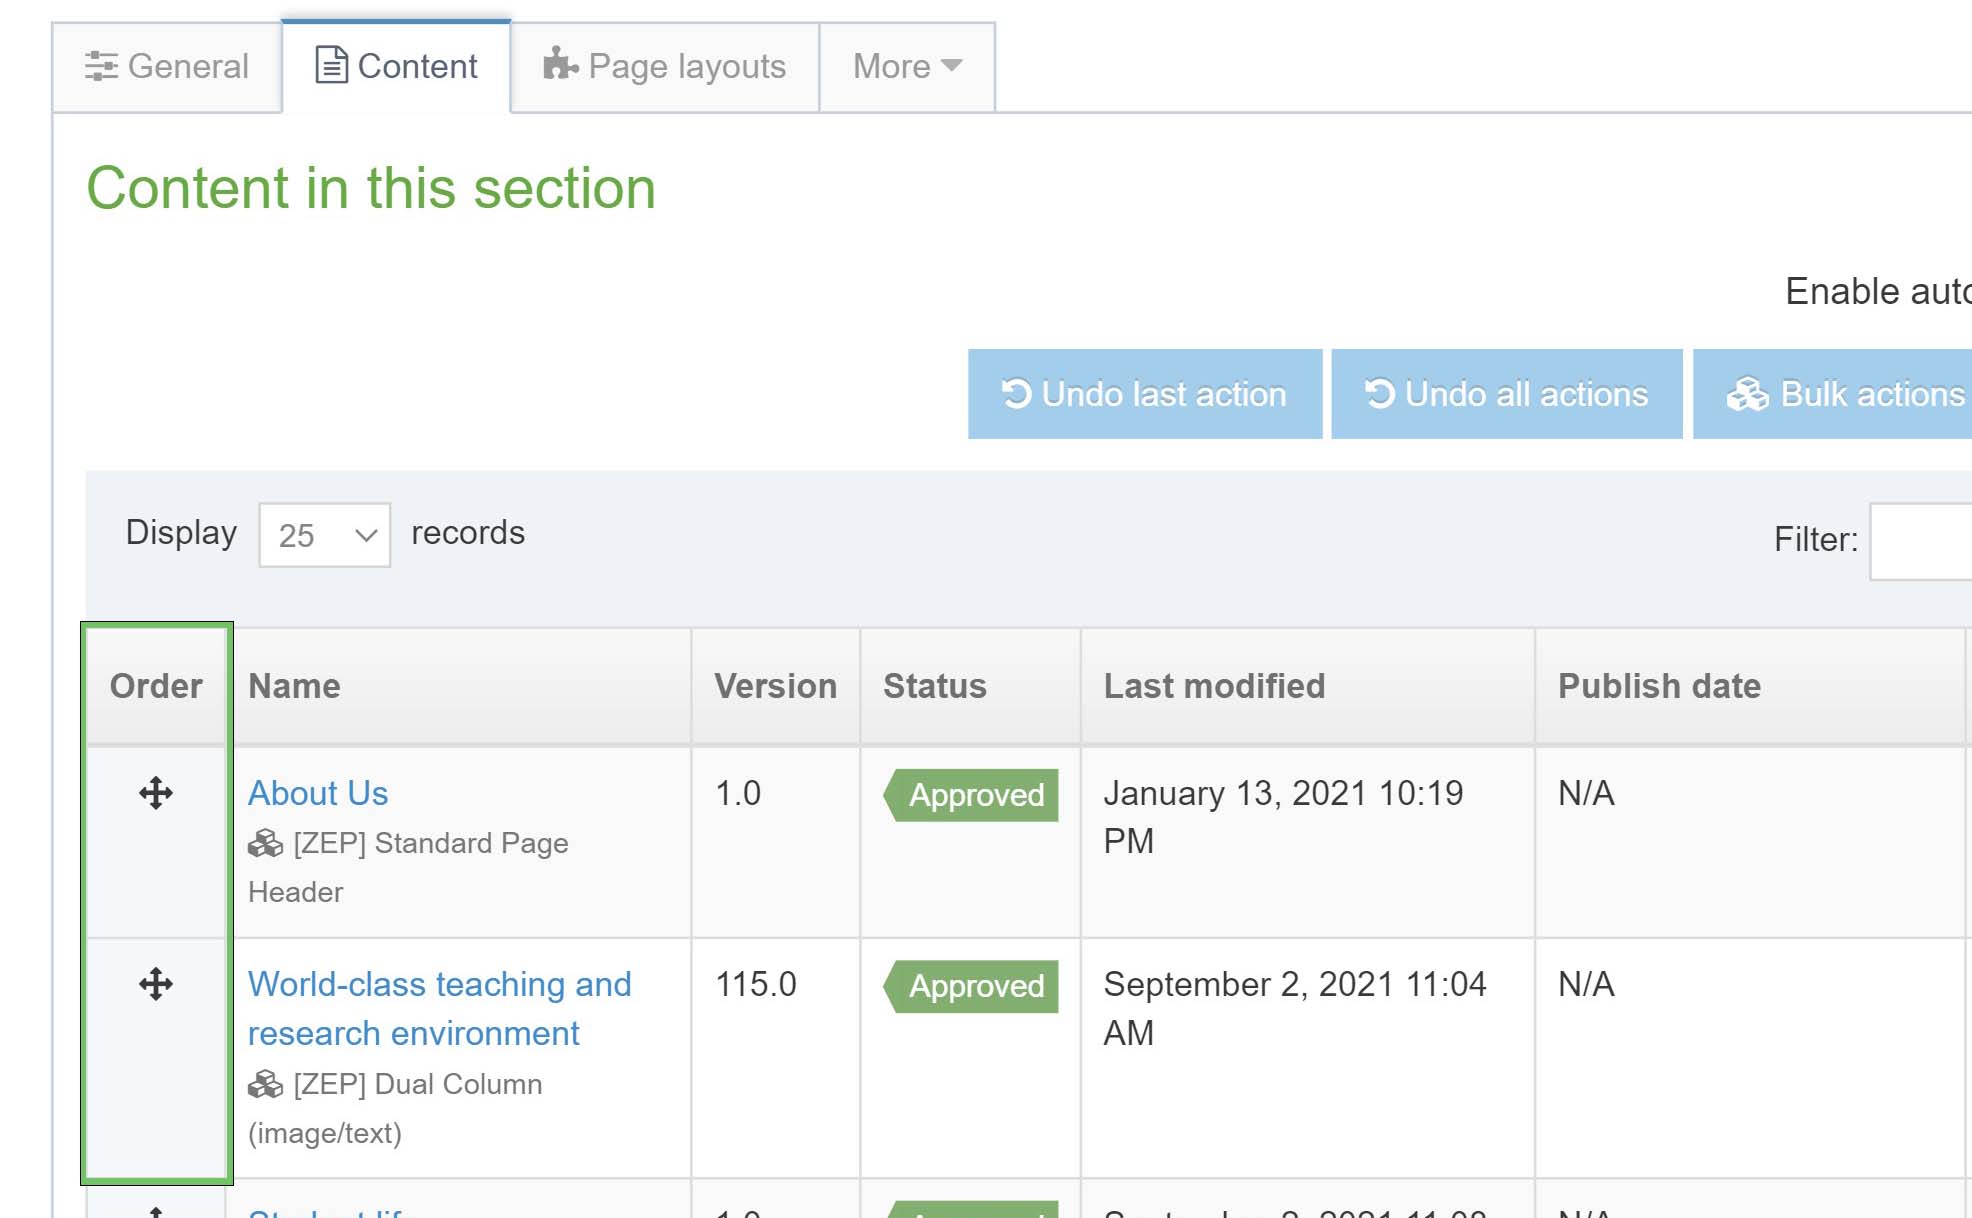
Use the Section Actions menu to the right of the section to select Edit Content. This opens the Content tab in the selected section. Here you'll see the content table and choose the content type to edit.
The content table displays 10 content items as a default. Use the 'Display X records' drop-down to increase the list to show all content contained in the page.
Every page should have a 'Spacer' Content Type at the bottom. The Spacer separates the content from the page footer.
All fields in the content type marked with a red asterisk (*) are mandatory. Hover the cursor over a field to display help text (eg purpose of field, number of words).
3 ways to view a preview of your page
- from the Site Structure, click the blue 'Actions' button next to the Section (page) you'd like to see. Select 'Preview Section'
- from the Content tab within your section, click the blue 'Actions' button next to any component. Select 'Preview Section'
- from the Content type/component page click the green 'Preview' button at the top right of the screen
The preview will open a view of the full page. It does this in a new tab or window (depending on your browser preferences). When you're done, close the tab to exit the preview.
Preview shows the latest changes to the page - whether they are published or not. Preview is not a reflection of the live site.
Saving your content
Save options explained
|
Option |
Description |
|
Save changes |
Saves the content with a status of Pending. Content then appears in the approval list but the page remains as it was before your edits. If the page is new, it will not show this content component while it is in a pending state. |
|
Save as draft |
Saves the content with a status of Draft. You can keep working on the content without risk of it being published, as it does not appear in the approval queue. Until it is approved, the previously approved version of the content (if there is one) will be published. |
|
Save and approve |
Saves and approves the content with a status of Approved. This button will only appear if automatic approval is configured for the user level. |
|
Publish now |
Saves, approves and publishes the content with a status of Approved. This button will only appear if Publish Now is enabled and automatic approval and Publish Now are configured for the user level. |
Publish content and the automated publish
The automated system publish finds and publishes all content which is ‘Approved’. The system publish:
- runs twice a day at 14.00 and 02.00 (GMT)
- takes 1 hour 30 minutes to complete
- helps T4 processes to run efficiently
Approved content is visible on the website once the automated publish is complete.
Publish on demand
Publishing content ’on demand’ outside of the scheduled publlish makes T4 run slowly. This function should only be used when there’s a business need to publish content changes immediately.
Don't use manual publish between 14:00 and 15:30 or 02:00 and 03:30 (GMT) when the automated publish is running.
To publish a piece of content straight away, edit the component and click the Publish button. To publish a whole section, locate the section in the Site Structure then use the Action menu to select 'Publish Section'.
Allow a few minutes for content updates to appear in your site. If the updates don’t appear, try refreshing your browser view (CONTROL+F5).
Re-order blocks of content
To re-order individual blocks of content within a section use the Order column. Click the cross-with-arrows symbol to the left of the component title. Then drag the component up and down the content list.
The order in the Content Table is the order in which the content will appear on the web page.
Preview your page to check the order of the content. Click the blue 'Actions' button on any component in the list to select 'Preview'.
Delete content
When you delete content in T4, it is not removed from the system immediately. When a Content Type or Section is set for deletion its status changes to 'Inactive'.
To delete content, click the blue 'Action' button next to the Content Type and click 'Delete'. The content status will change to Inactive.
To delete a section (page), find the page in the Site Structure. Click the blue 'Actions button' and select 'Delete'. The section status changes to Inactive. The section icon colour changes from black to red in the Site Structure.
Content and sections marked ‘Inactive’ are removed from T4 each Tuesday between 08.00 and 10.00. Once removed from T4 deleted content or sections cannot be recovered.

Change the status of sections and content
You can change the status of inactive Sections and Content Types back to ‘Approved’ while they are still visible in T4.
To change the status of a Section go to the Site Structure, and use the Actions menu to Edit Section. In the General tab change the status from Inactive to 'Approved' or 'Pending' then Save changes.
To change the status of a piece of content edit the content. Use the 'Save Changes' options to change the status to 'Pending' or 'Approved' then Save changes.
Archive a section
Temporarily remove a published section/page from your website by moving it into an Archive section. The page can be re-introduced to the live site structure when required.
An Archive section is used to ‘hide’ sections or content types from the Site Structure and so from the published site.
A section moved into the Archived Content section is removed from the live site at the next system publish.
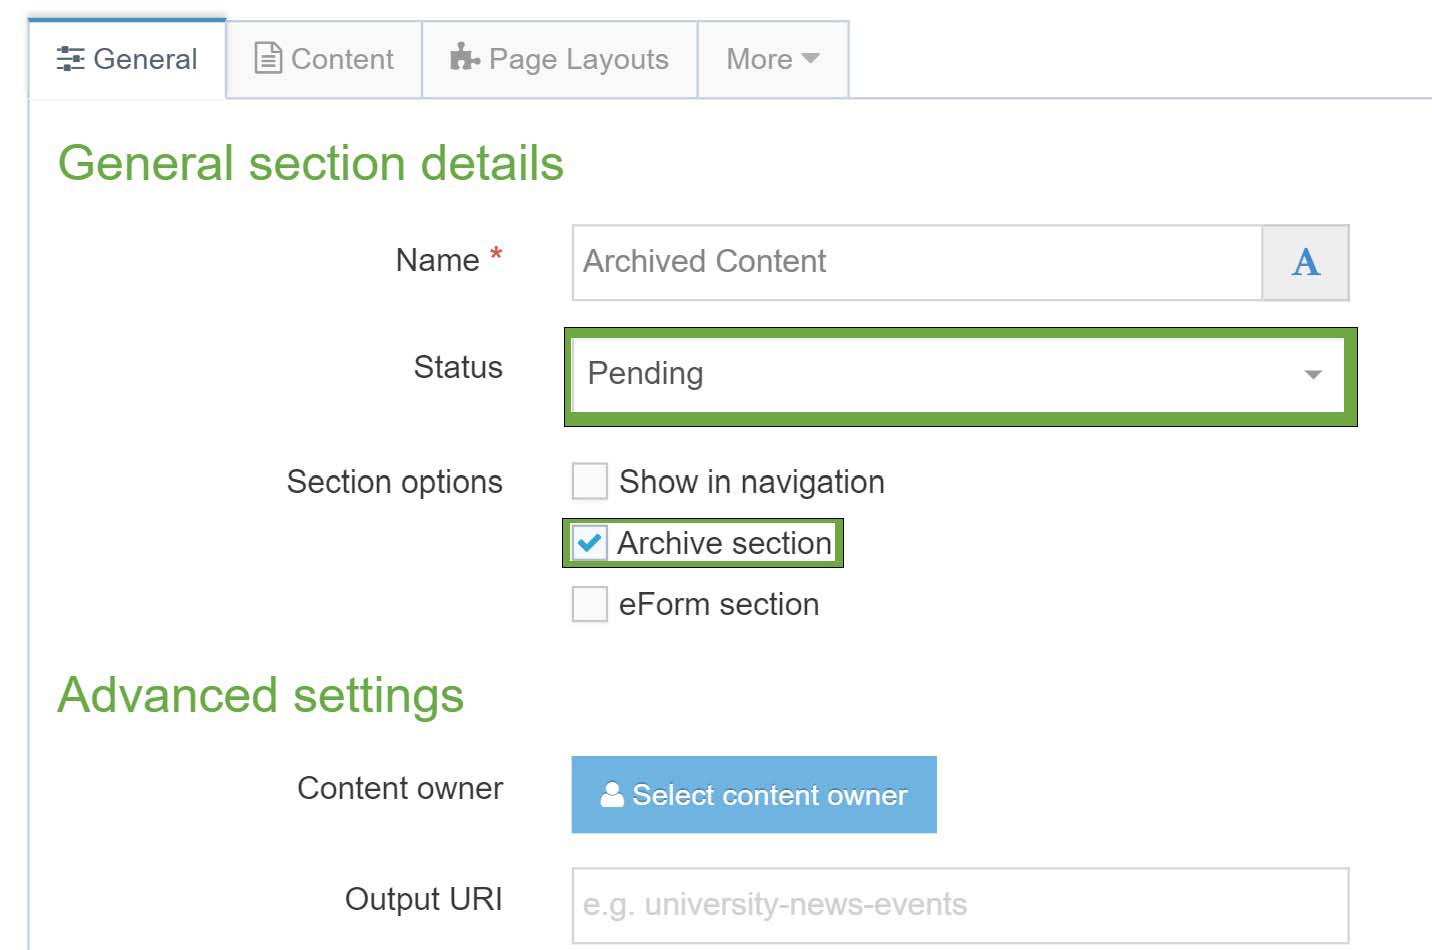
You’ll find the Archived Content section on your Site Structure. If your site doesn’t have an Archive section, you can create one:
- Find the site Homepage in the Site Structure. Use the Actions Menu to select Create Section.
- In the General Tab:
- Name the section: Archived Content
- Set section 'Status' as Pending
- Uncheck 'show in navigation'
- Check Archive section (sets the section to not publish by default).
- Click Save Changes to add the archive section to the Site Structure.
Move Section
To move a section into the Archive use the Action Menu to the right of the section and choose Move section. A Site Structure window will open. Choose the Archive section. The section will move out of Site Structure into the Archive.
To move a section into Site Structure, use the Move Section function. Choose where the section should appear in the structure. Click on the section above this (the parent) to add the page below (a child).
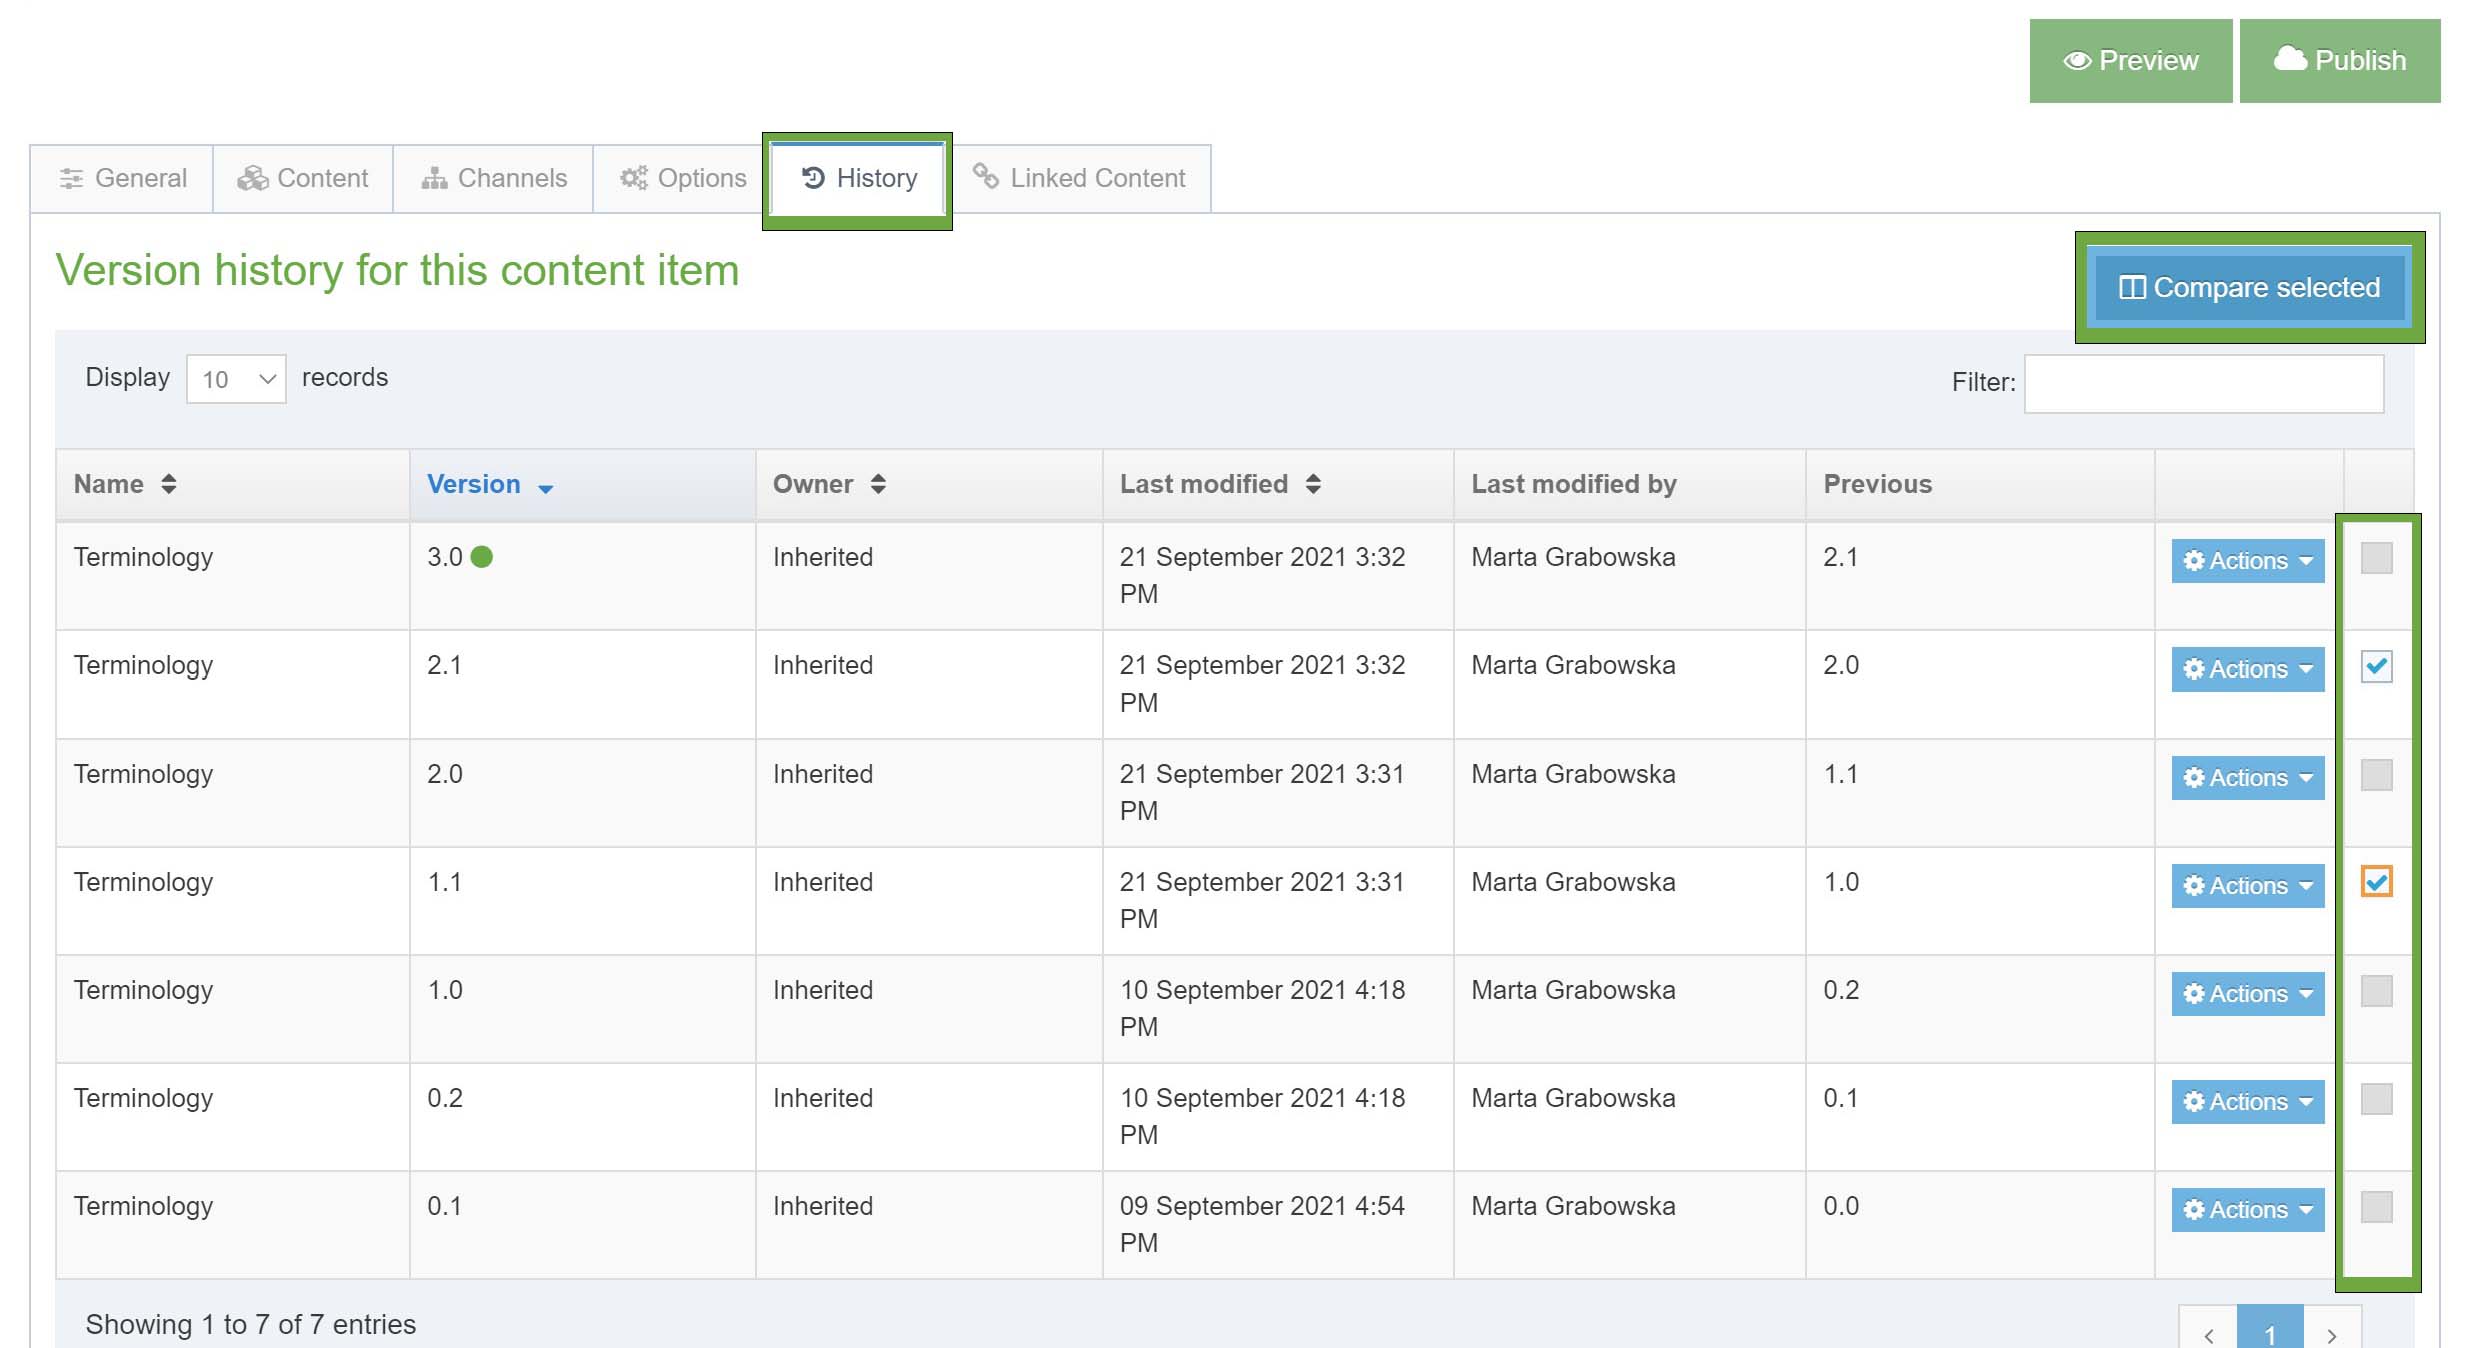
History
T4 keeps a history of all versions of content created. This enables you to view all items saved in History, compare versions, and revert to a previous version at any stage if needed.
Select the History tab from the Content Item screen. This will open the Version history screen.
Comparing content
In the last column are checkboxes.
To compare content, select two checkboxes. When two versions are checked the Compare Selected button is activated. You can only compare two items of content at a time.
After you compare content, click 'Back' to return to the History tab.