
Marking Exams in Inspera
NEW: A vision for education and skills at Newcastle University: Education for Life 2030+
Marking Your Exams in Inspera
Student numbers are displayed in Inspera, but their names and other identifying information are not visible. This means that students' work can be marked anonymously. Once the grades are finalised they are transferred to the Canvas gradebook where individual students' grades can be identified.
The Digital Exams Team have created a set of videos to help guide users on marking exam questions in Inspera. These marking videos depict various steps in the marking processes.
How to Navigate Inspera Grade
There is guidance available from Inspera that details workspace navigation when using Grade. Within the Inspera Grade area, as a marker you will have access to the Grader workflow.
Workspaces
Find out about the different workspaces in the following drop-downs.
Grading Overview
This area as an overview depicts the grading status of the exam. For example if marking has not yet been finished, you can click ‘complete your grading’ and be directed to the Marking view. You can click on student IDs and be directed to the Candidate in focus view. You can also search by typing student IDs into the search box.
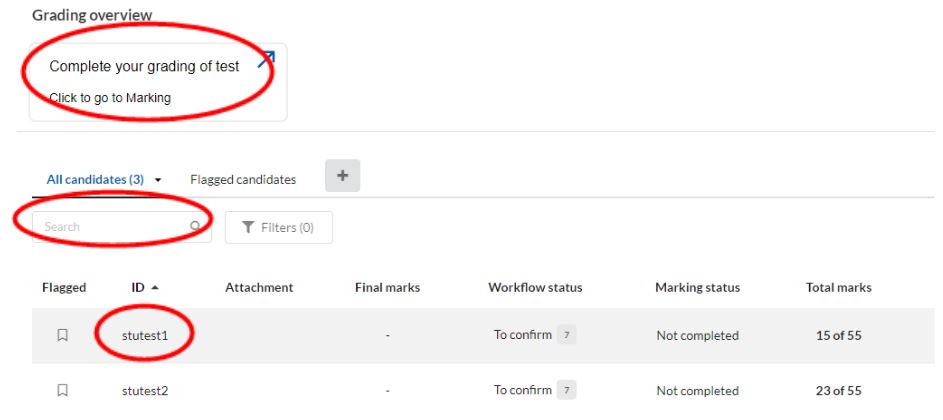
The Grading Overview has a default filtering tabs of 'Flagged candidates' next to 'All Candidates'. This area will reflect if any student has been ‘flagged’. You can flag a student in the Grading Overview by clicking the 'flag' icon on the left.
Candidate in Focus
You are able to navigate to any student by using the drop-down (to see a list of all students) or by using the ‘next’ arrow button on the right, which will move to the next student.
There is a status shown in Grade for each student. For example, 'Calculating - Incomplete marks'.
Each student’s candidate in focus area will show questions answered and marking completed.
Marking
You are able to navigate to students and questions. To move between students, use the drop-down (to see a list of all students) or by using the ‘next’ arrow button on the right, which will move to the next student.
Please note: if you are moving between students, the question currently viewed will automatically show for the next student. However if the next student has not answered the current question, the marking flow will divert to the next available question. This will occur for exams using Candidate Selected Questions.
To navigate to questions, use the drop-down (to see a list of all questions) or by using the next arrow button on the right, which will move to the next question.
Questions
This area provides an overview or data table of questions within the exam. You can view all questions, manually marked questions or you can click the question name to be directed to the marking view of that question. You can search for a question using the Search box - note the search will use the question title.
If you wish to you can order the questions in alphabetical order by clicking on Question Name.
How to Review Auto-marking in Inspera
Within the Marking workspace you are able to review all auto-marking completed in Inspera Grade. Marking information will be presented on the right-hand side. Auto-marked questions in Inspera are automatically marked by Inspera and this is indicated by 'Automatically calculated' within the 'Marks' area. Graders can see the question type, result, marks awarded. During your marking, it is possible to filter the view to only see auto-marked questions.
It is important to avoid errors when authoring questions if at all possible. Remember that when you are creating questions and question sets, you can preview and answer a question to check how many marks will be awarded. Testing different answer combinations when you preview your questions can help confirm whether the answer key and grade settings are correct.
There are a few options available to edit auto-marking, including override, edit answer key and edit question weighting.
Override Auto-Marking
Graders can override marks on automatically calculated questions while marking an exam by clicking the override option. The marks entry box will then become editable. You can type the new mark answer into the box and press 'apply'. For audit trail purposes, any overridden marks will be logged. You can revert to the auto mark by selecting ‘use calculated’.
You can use this option if a student has given an alternative answer that you are happy to award them marks for.
Important note: maximum marks are defined at the time of question authoring. It is not possible to override marks to be of a higher value than already outlined maximum marks.
Override is only applicable to the individual student and question you are grading at the time. There is no functionality to override in bulk.
Edit Answer Keys (MCQs only)
For Multiple Choice Questions (MCQs) you are able to edit the correct answer (otherwise known as the 'answer key') after the exam. For example, if an error has been made when selecting the correct answer during the authoring of the question. Note that this is function not currently available for any other question types.
To change the correct answer of an MCQ, click on 'options' within Grade. Under Settings, click ‘Edit answer keys (MCQ)’. A settings screen will show, you will be able to select the MCQ you wish to edit from a drop-down, and be able to select one alternative. The current answer will be depicted as a selected radio button. To choose a new correct answer, click the radio button next to the alternative option and press update.
Important note: editing answer keys for the MCQ will update the auto marking for all students who have answered this question in the exam. It will also update the correct answer in the Question Set itself, so the MCQ answer is correct for future use.
Question Weights Edit
Should an exam question have an error within it, and should be removed from the exam results, the question weight can be edited to zero. Note this is possible for both auto marked and manually marked questions.
To remove the weighting of a question, click on 'Options' within Grade. Under 'Settings' click ‘Question weights’. A settings screen will show, and you will see all exams within the exam in a list. Automatically all questions will be weighted at 100%, meaning all correct answers receive their awarded marks. To remove the question weighting from the exam, overtype 100 with a zero in overridden weight and press 'update'.
Editing a question weight affects all students' attempts for the test. This will ensure that all answers to that question are discarded and the results are not marked/factored into the total score. It does not affect the question itself or the question set, so if there is an error in the question and you plan to use it again in future you will need to update the question separately.
Important note: editing question weights is only available for exams where the final total score matches across all students. If for example, an exam uses Candidate Selected Questions or Random Pulling, removing the weighting of a question could potentially impact marks for only a subset of students. Further information about features such as Candidate Selected Questions or Random Pulling, and implications of question weight edits can be found within our Content Creation Features webpage.
How to Mark Manually Marked Questions in Inspera
For manually marked questions, such as an essay question, the grader has to set the marks. Within the Marking workspace of Grade, you are able to mark all manually marked questions from your exam. Marking information will be presented on the right-hand side. Graders can see the question type, result, marks available. Questions that have not been awarded marks are marked in the upper right corner with Not set. To input a mark, type this into the Marks box.
Marks can be entered to a decimal point if desired.
Once a mark as been entered the marks status will update and for audit purposes you’ll see who edited the mark and when.
To remove your given mark, you can press ‘reset’.
Important note: maximum marks are defined at the time of question authoring. It is not possible to input marks which are to be a higher value than outlined maximum marks.
The most commonly used manually marked question type is the Essay Question. When marking essay questions it is possible to annotate an individual student response using the commenting tools. Annotations can be made either linked to the question to be available to a wider audience such as the whole cohort, or against an individual student response, visible to just that student. You can add annotations or page notes during manual marking. Find out about these in the following drop-downs.
Adding Annotations
Most commonly used with manually marked essay questions, markers are able to add annotations onto submissions. These annotations, or comments, are associated with a specific text entry on the submission and can either be:
- Written to be shared with students
- Written to be shared with co graders or moderators
- Noted only for your own view
To create an Annotation, click the left mouse button, hold it down and move the mouse across the text you want highlighted, then click 'Annotate'.
An annotation box will pop out:
- To choose if students or co-markers should view this annotation, use the drop-down arrow next to candidate
- To enter your comment, type into the text box
- To save, press save
- To make a note only for yourself, using the drop-down arrow next to save and select ‘only me’.
Important note: annotations are for the individual student’s submission to the specific text area selected.
Adding Page Notes
Most commonly used with manually marked essay questions, markers are able to add 'Page Notes' onto submissions. Page Notes are comments which are not associated with a specific text entry on the submission but are to be a more generalised comment about the question submission overall. These can be:
- Written to be shared with students
- Written to be shared with co graders or moderators
- Noted only for your own view
To add a page note, click the page icon to the right of the submission text.
A page notes box will pop out:
- To choose if students or co-markers should view this annotation, use the drop-down arrow next to candidate
- To enter your comment, type into the text box
- To save, press save
- To make a note only for yourself, using the drop-down arrow next to save and select ‘only me’.
Important note: page notes are for the individual student’s submission to the question.
To leave overarching feedback for the whole cohort for the full exam, please see the General Feedback Release section of our Feedback Release page. This explains how markers can release a ‘common feedback’ statement to all students once all submissions have been graded.
How to Confirm Grades
When you have checked the marks for automatically marked questions, and have completed marking any manually marked questions, you must confirm the final grades. Once the final grades have been confirmed in Inspera, the mark will be automatically added to the Canvas gradebook but will not be visible to students. The releasing of the mark in the Canvas gradebook should be managed in the same way as any other assessment.
Once the final grades are confirmed in Inspera they will sync to the Canvas Gradebook but will not be visible to students unless manually posted. You can choose to post the grades in the Canvas Gradebook, in the same way as for any other assessment in Canvas. Note that how the mark displays is controlled by the points setting in the Canvas assignment setting for the exam. For example if the mark is set to 100 in the Canvas Assignment, it will appear in the gradebook as a proportion of 100 regardless of what the mark available in Inspera is. The points in the Canvas assignment can be updated as required.
The marks in the Canvas gradebook can be manually adjusted if required after the sync from Inspera.
If you need to download the marks into CSV from Inspera for manipulation this can be done from the 'Options' menu at the top right of the screen in grade. You can also see the FAQ on this page 'Can I download marks as an Excel file?' You could then copy these into the correct format for import to the Canvas gradebook.
Grades from Inspera (released onto Canvas Gradebook) can be transferred into NESS.
Transferring Grades into NESS
It is now possible to pull Inspera and Numbas exam grades from Canvas gradebook, directly into NESS. For instructions on how to do this please see NESS Guidance.
How do I access and navigate student responses?
Accessing Student Responses to Grade
To access test results, access the Inspera exam from either the Canvas Assignment. If you are already in Inspera, you can access via Deliver>Tests. Once you are in the Deliver area of the exam in question, you should click on 'Open in Grade'.
Within the Grade area, you can view an overview of the marking for a test. As part of this is it possible to review test results at both test and student level. There is guidance in the Inspera Help Center on navigating the marking workspace, and navigating between students and questions.
Navigating Student Responses
Once in the Grade module for the test, you should navigate to 'Marking' under the 'Grader' workspace on the left hand side of the screen.
It is possible to view and mark responses to questions either by viewing or marking all of an individual student's responses to a test, or by viewing or marking all students' response to a single question, by using the navigation functionality in the marking header at the top of the screen.
How do I add graders to an Inspera test?
Graders can be added either before or after students take the test. You can add one or multiple graders depending on who needs to do the marking. To add a colleague as a Grader so that they can mark questions in a test they must have already accessed Inspera on a previous occasion.
If the marker has not yet accessed Inspera, ask them to click the link to the Inspera test in Canvas (note that they must be enrolled on the Canvas course with either the Teacher or the Teaching Assistant role). When a colleague clicks the link to the Inspera test they will automatically be added as a 'Contributor' with all of the available roles, including 'Grader'.
Alternatively, if a colleague has previously accessed Inspera, you can manually add them as a Grader by searching for their name or University username. Inspera have guidance on how to add contributors to a test. You might want to do this before marking begins, so that you can assign marking without needing to wait for the marker(s) to click the link to the Inspera test in Canvas.
Once all of the markers have been added to the test as Graders, and any contributors who do not need to mark have had the Grader role removed, you can choose how to assign the marking:
- If one member of staff is marking all questions from all students, no further steps are needed to assign the marking.
- If each Grader is marking the work of different students, you should check out our Grading Committees webpage.
- If each Grader is marking the answers to different questions, the best option currently is to agree with the other markers who are marking each question.
Can I find out which manually marked questions still require grading?
Yes, within the Inspera Grade area you can view ‘incomplete marking’.
How to access the Incomplete Marking area:
- On the relevant Grade area, from the workspaces on the left go to ‘Grading Overview’
- This as default should show all candidate (students) with final marks
- Next to all candidates, select ‘incomplete marking':
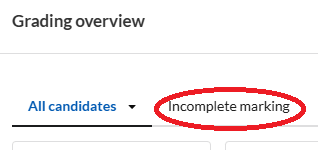
- This should show student IDs with some form of marking which is incomplete.
Can I download marks as an Excel file?
Inspera enable two versions of Excel raw mark data pulls. On Grade, there are now two options for downloading raw marks as Excel files:
- One which shows Candidate IDs, question answers (correct/incorrect) and total score.
- Another which shows answer criteria (if using essays there’s an option to have criteria marking, i.e. score 1-5 = Fail, score 6-10 = 3rd, score 11-15 = 2:2 etc).
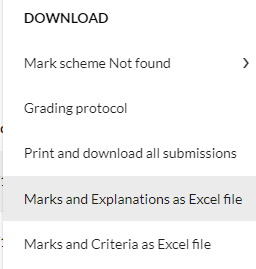
If you’re not using criteria marking, you’d want to select 'Marks and Explanations as Excel file' (from the Options dropdown).
How can I transfer grades to the Canvas Gradebook?
Once you have confirmed the final grades in the Inspera Grade area, the numerical marks are sent to the Canvas Gradebook. You’ll need to make this visible to students in the same way you would for any Canvas Assignment. Initially all marks will be shown in the Gradebook with the crossed-out eye icon.
The date of the assignment availability would also need to be altered. The Digital Exams Team set up the availability on Canvas to match the exam duration (with any extra time included). The ‘available until’ date would therefore need altered to allow students to access feedback until a specific date.
Please note that the Gradebook will likely reflect marks as a proportion. The Digital Exams Team set up exams with the points in the Canvas assignment set as 100 as standard.
Finally, please ensure the Grades area on Canvas is accessible for students. If it is hidden, they won’t be able to see their grades in the Gradebook.
What are Bands and Criteria?
Bands and Criteria is a manual strategy to mark items using criteria and bands. Enable graders to mark within categories/criteria and award marks using thresholds/bands per category. The bands and criteria functionality can be used as a marking rubric.